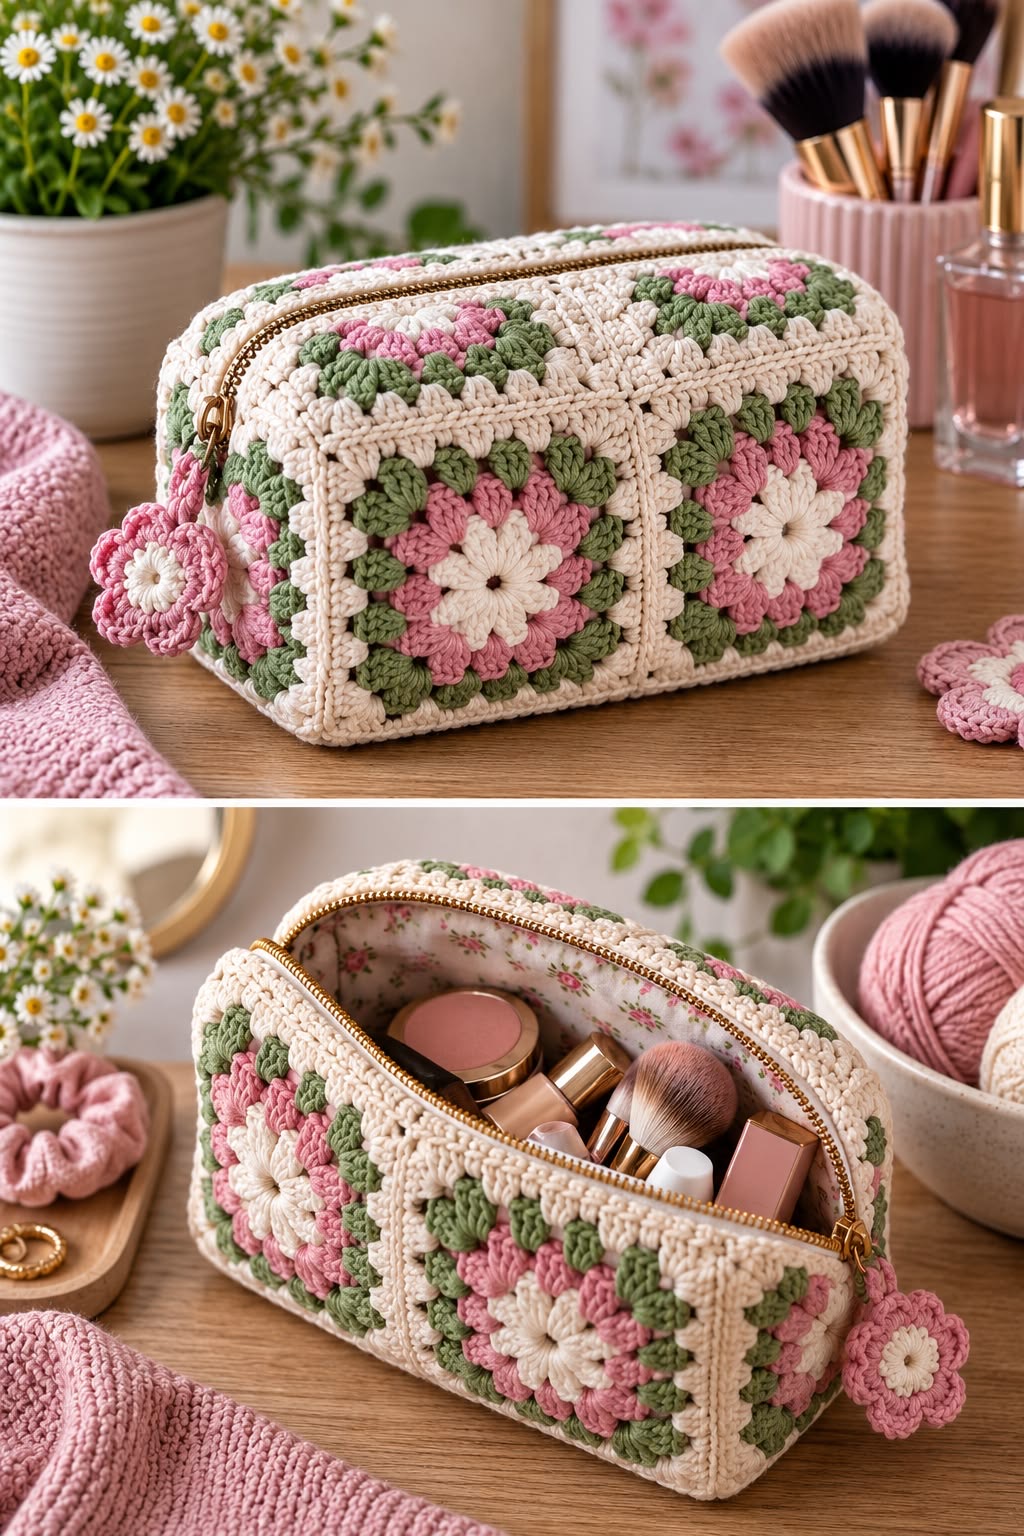
This crochet floral makeup bag is the kind of handmade project that looks charming on a dressing table and surprisingly professional once the zipper and lining are added.
The design in the photo combines classic granny-square construction with soft cream, dusty pink, and sage green yarn. The raised flower centers give each square a three-dimensional look, while the rectangular shape makes the finished pouch practical for makeup, toiletries, crochet hooks, small accessories, or travel essentials.
The exact original stitch counts cannot be confirmed from the image alone, so the tutorial below is an inspired version designed to recreate the same overall style.
What Makes This Crochet Bag Special?
The main feature is the floral granny-square pattern.
Instead of using ordinary flat granny squares, each motif begins with a textured cream flower.
Pink stitches surround the flower, followed by sage-green details and a cream border.
Several squares are joined together to build the front, back, top, and sides of the cosmetic bag.
A gold zipper adds a polished finish.
The floral fabric lining inside is another beautiful detail because it hides the back of the crochet stitches and prevents small makeup items from poking through the gaps.
Materials
For a medium makeup bag similar to the one shown, you will need:
- Cream cotton yarn
- Dusty pink cotton yarn
- Sage-green cotton yarn
- 3.5–4 mm crochet hook
- Yarn needle
- Scissors
- Stitch markers
- Approximately 25–30 cm zipper
- Cotton fabric for lining
- Sewing needle and thread
- Optional interfacing for extra structure
- Optional metal zipper pull or charm
Cotton yarn is ideal because it gives the squares clean stitch definition and keeps the pouch reasonably firm.
A soft acrylic yarn can work, but the finished bag may stretch more.
Suggested Finished Size
A practical cosmetic bag can measure approximately:
- 24–26 cm wide
- 14–16 cm high
- 8–10 cm deep
You can easily make yours larger or smaller.
The easiest way to resize the project is to change the number of granny squares rather than trying to enlarge every square dramatically.
Make one complete motif first.
Measure it.
Then calculate how many you need for the dimensions you want.
Crochet the Flower Center
Begin with the cream yarn.
Make a magic ring.
Chain 2.
Work 12 double crochet stitches into the ring.
Pull the magic ring closed.
Join with a slip stitch.
For a more raised center like the flowers visible in the photo, you can use puff stitches instead.
For example, work six puff stitches around the magic ring with one chain between each puff.
This creates a fuller little flower center.
Finish the round and fasten off the cream yarn.
Make the Pink Petals
Join the dusty pink yarn into one of the spaces around the center.
To create each petal, work something similar to:
- 1 single crochet
- 1 half double crochet
- 3 double crochet
- 1 half double crochet
- 1 single crochet
Repeat around the center.
Aim for six or eight rounded petals, depending on your chosen flower structure.
The petals should sit slightly above the background rather than lying completely flat.
That little bit of dimension is what gives the finished bag its soft floral look.
Add the Green Round
Join the sage-green yarn behind the petals.
Work around the flower using small clusters.
A simple option is:
3 double crochet, chain 1, 3 double crochet.
Use slightly larger chain spaces at four evenly spaced points.
These will eventually become the corners of the granny square.
The green stitches should look like little leaves peeking between the pink petals.
Do not worry if the motif still looks round at this stage.
The next round will square it.
Turn the Flower Into a Square
Switch back to cream yarn.
Work around the green section.
At each corner, use something like:
3 double crochet, chain 2, 3 double crochet.
Along the straight sections, work groups of double crochet into the available chain spaces.
Continue around until the motif clearly forms a square.
If needed, add another cream round using single crochet or half double crochet.
The final border makes joining the squares much easier.
How Many Squares Do You Need?
For a pouch close to the proportions in the picture, a useful layout would be:
Front: 4 squares
Back: 4 squares
You may then use smaller connecting panels for the sides and bottom.
Another option is:
Front: 6 squares arranged 3 × 2
Back: 6 squares arranged 3 × 2
This creates a slightly larger cosmetic bag.
You can also make additional granny squares for the top strip beside the zipper.
Before joining anything, arrange all your motifs on a table.
Make sure their sizes match.
If one square is noticeably larger, gently block it before assembly.
Block the Granny Squares
Blocking makes a huge difference with motif-based projects.
Lightly dampen the squares.
Lay them flat.
Stretch each one into an even square.
Pin the corners.
Allow them to dry completely.
Do not aggressively stretch them.
You simply want the motifs to become uniform.
This makes the joining lines cleaner and helps the finished cosmetic bag look less homemade in the “my cat helped with this” sense.
Join the Squares
Lay the squares in your chosen arrangement.
You can join them using several methods.
Slip Stitch Join
Place two squares with the wrong sides together.
Slip stitch through corresponding edge stitches.
This creates a visible decorative ridge.
Mattress Stitch
Use a yarn needle and sew the squares together.
This gives a flatter seam.
Single Crochet Join
Hold two squares together and work single crochet through both edges.
This creates a strong seam and works especially well for bags.
For the style in the image, a neat cream-colored joining seam works beautifully.
Build the Front and Back Panels
Join your squares into two equal rectangular panels.
For example, if using four motifs per side, arrange them two across and two high.
If using six motifs, arrange them three across and two high.
Check that both panels are exactly the same size.
Add one round of single crochet around each finished panel.
This creates an even edge for joining the bag together.
Crochet the Side Panel
Instead of making the bag completely flat, add a gusset.
A gusset is simply a long strip that creates the sides and bottom.
Chain until the strip measures approximately 8–10 cm wide.
Work rows of single crochet.
Continue until the strip is long enough to travel:
down one side, across the bottom, and up the other side.
Use cream yarn for a clean finish.
You can also incorporate small pink or green stripes if you want the side panel to match the floral motifs.
Join the Bag Body
Place the gusset around the front panel.
Pin or stitch-marker it in position first.
Crochet or sew the gusset to the front panel.
Then attach the back panel to the opposite edge.
Work slowly around the corners.
Keep the seams firm but avoid pulling the yarn so tightly that the bag puckers.
Once attached, the pouch should begin holding its rectangular shape.
Reinforce the Top
The zipper area needs extra strength.
Work two or three rounds of single crochet around the upper opening.
Use cream yarn.
This creates a dense border where the zipper can be sewn securely.
If the bag still feels too soft, add another round.
A little firmness here helps the zipper open smoothly.
Add the Zipper
Choose a zipper roughly the same length as the opening.
A gold zipper looks particularly beautiful with dusty pink and sage green.
Position the closed zipper along the inside top edge.
Pin or clip it carefully.
Hand-sew the zipper to the crochet border using strong thread.
Take small stitches.
Make sure the zipper stays centered.
Check it frequently by opening and closing it while sewing.
Do not wait until the final stitch to discover that the zipper has somehow developed a personality of its own and now curves sideways.
Make the Fabric Lining
The floral lining visible in the photo gives the bag a professional finish.
Choose lightweight cotton fabric.
Measure the inside dimensions of the finished pouch.
Cut:
- 2 rectangular pieces for front and back
- 1 long strip for the sides and bottom
Add approximately 1 cm seam allowance around each piece.
Sew the fabric pieces together.
Leave the top open.
Turn the lining right side out.
Insert it into the crochet bag.
Fold the upper raw edge inward.
Hand-sew it neatly just below the zipper.
Add Interfacing for More Structure
If you want the pouch to stand upright like the one in the image, add lightweight or medium interfacing to the lining.
Iron the interfacing onto the wrong side of the fabric before sewing the lining.
This creates a firmer cosmetic case.
You could also insert thin plastic canvas between the crochet and lining on the bottom.
That helps the bag stay flat when placed on a table.
Crochet a Flower Zipper Charm
The little flower charm shown near the zipper is a beautiful finishing touch.
Make a tiny flower using the same dusty-pink and cream yarn.
Start with a magic ring.
Make five or six petals.
Use cream yarn for the center.
Attach the flower to the zipper pull using a small chain loop.
You can also add:
- A pearl bead
- A wooden bead
- A tassel
- A small metal ring
Keep the decoration lightweight so it does not pull down the zipper.
Color Variations
The cream, pink, and sage combination creates a romantic cottage-style look.
But the pattern can easily change personality with different colors.
Try:
- Cream + lavender + olive
- Beige + terracotta + sage
- White + baby blue + gray
- Black + burgundy + forest green
- Cream + mustard + brown
- Blush + ivory + eucalyptus green
A monochrome version using different shades of one color can also look very modern.
What Can You Use It For?
Although it looks like a makeup bag, the same design works for many purposes.
Use it as a:
- Cosmetic pouch
- Toiletry bag
- Crochet hook case
- Travel organizer
- Pencil case
- Small project bag
- Medication pouch
- Hair accessory organizer
- Gift bag
You could even make several sizes as a matching travel set.
Washing and Care
Hand washing is safest.
Use cool or lukewarm water with a small amount of mild detergent.
Avoid soaking the zipper hardware for unnecessarily long periods.
Gently press the bag.
Do not twist.
Rinse well.
Press between towels to remove extra moisture.
Stuff the bag lightly with clean towels while drying so it keeps its rectangular shape.
Allow it to dry naturally.
Frequently Asked Questions
Is this project suitable for beginners?
A confident beginner can make it.
You should be comfortable with chains, single crochet, double crochet, slip stitches, and joining motifs.
How many granny squares do I need?
Usually 8–12 depending on the size of your motifs and the desired bag dimensions.
What yarn is best?
Firm cotton yarn is an excellent choice because it holds its shape and shows the floral stitches clearly.
Does the bag need lining?
Technically no, but lining is strongly recommended for makeup or small items.
Can I make it without a zipper?
Yes.
You could use a magnetic snap, buttons, or a drawstring top instead.
Can I make the flowers flat?
Absolutely.
Flat flowers are easier to crochet and may be more practical if you want a very smooth pouch.
Can I make a larger version?
Yes.
Add more granny squares or enlarge the side gusset.
The same technique could even be used for a handbag.
Final Thoughts
This floral granny-square makeup bag combines several classic crochet techniques in one very pretty project.
You get textured flowers, granny-square construction, motif joining, bag shaping, zipper installation, and lining—all without needing an extremely complicated stitch pattern.
Work one flower square at a time.
Block everything carefully.
Join the motifs into firm panels.
Add the side strip, zipper, and floral lining.
Then finish with a tiny matching flower charm.
The result is practical enough for everyday use but pretty enough to make as a handmade gift.
And if someone asks where you bought it, you are absolutely allowed to enjoy the moment before saying, “Actually, I made it.”